Sunday 16 September 2012

Renovating a greenhouse.

Following on from the tree house - I have decided to take on a more ambitious and complicated project.  When I moved into my current house there was a derelict greenhouse at the bottom of the garden.  It was totally overgrown and hadn't been used in at least 15 or 20 years.  It had a fairly sold brick base - but the wooden glazed structure on top was totally rotten and falling apart.


The above photo shows the greenhouse after I'd cleared away all the overgrowth and cleaned it up a bit.  I quickly decided that I had to remove the wooden structure as the glass was falling out and it was quite dangerous.  On closer inspection I noticed that the brick structure was three tiers of brick thick.  You can also see the remains of another brick wall just in front of the door.  The structure didn't start life as a greenhouse - it started life as a bomb shelter.  The brick wall at the front would have been the blast protector for the entrance.  Below is a photo found that shows what it may have looked like originally.


Over 2 years ago I got several quotes to have the greenhouse renovated - and they ranged from £4k to £7k.  That was far too expensive for me so I decided to remove the wood myself and erect a plastic greenhouse over the top leave any renovation for a future date.


I decided to start the renovation shortly after completing the treehouse.  My plan is as follows:
1 - Level off the walls so they are all the same height (one side is raised)
2 - Fix the areas of the walls where there are broken or worn bricks - cement the tops to make the whole structure level.
3 - Build a simple apex wooden structure on top of the walls
4 - Glaze the greenhouse with a plastic horticultural glass

I started step one using a hammer and masonry chisel - despite the fact that the mortar is over 70 years old it was still solid as a rock and progress was extremely slow.


So I bit the bullet and rented a Hilti TE 706-AVR Breaker from HSS.  Check it out..  "Urgh urgh!"


Managed to succeed with this where the Luftwaffe had failed and demolished the top part of the wall in no time.  Now all 4 walls are the same height.


Next steps are to clean up the mess and get rid of all the old bricks - saving one or two for repair jobs elsewhere.

Then after that - tidy up the brick work.  This project will evolve slowly over the coming months.  My target is to be able to grow tomatoes and chillies in it next summer.


Saturday 2 June 2012

Day 9

First thing today - had to go and buy a new drill as I'd knackered the old one.  Went for a Bosch PSB 500RE - money well spent.  Got the rest of the railings up in a fraction of the time it took me to do the others last week.  I had a bit of decking left - so I also made a bench for the kids to sit on inside the treehouse.


With all the railings done - there was just one thing left to do - attach the slide.  My parents had bought the slide for Bobby's birthday present.  The instructions said to fit it with screws - but I wanted to be able to remove it easily when cutting the lawn - so I got some 100mm M6 coach bolts and wing nuts.


That's it pretty much done.  I'm still deciding whether or not to put doors on or felt the roof.  But for now - it's pretty much done.

Sunday 27 May 2012

Day 8

Another scorcher of a day.  Had big plans, but the heat really slowed me down.  I managed to put up most of the railings - but still have more to do.  I put them in place using "L" brackets above and below 2*2 struts.  Doesn't look the prettiest but they certainly are sturdy.


Getting the screws in was murder as the gap between the rails meant I couldn't get a drill or a screwdriver in.  Luckily, I had a small cordless electric screwdriver I'd received as a Christmas present that saved the day.  I was surprised at the power it had.

It was really hard work today,  what with awkward screws and dodging all the wasps and bees that were buzzing around the laburnum in full bloom.  By the time I'd got all but the back rails in place I was shattered. They and the roofing felt will have to wait till next weekend.


I managed to knacker my electric drill today.  As I was screwing at an awkward angle, I caught the large black piece against one of the "L" brackets.  This resulted in the drill tightening its grip considerably on the screwdriver bit.  It is now firmly in place and I cannot get it out or loosen it in the slightest.  From now on I will only be able to use that drill for screwing philip's head screws.  If I can't sort it out I'll need to buy a new drill next weekend.


Saturday 26 May 2012

DAY 7

Summer has arrived at last!!  Got up early to make the most of the day.  All week the sealing of the edges of the plywood had been playing on my mind - so first thing I went to Wickes (no joy) and then Homebase where I picked up a tin of International 3 in 1 - Primer, Sealer and Undercoat.  Painted all the edges of the sheeting.  Next, out with the blue paint again and gave one side its first coat - then the other side its second.  I figure one coat should be enough for the interior.

With all the sheeting painted - I screwed the 2*2 wood I'd cut to size last weekend into place.  This meant I could fit the structure together for the first time and validate my measurements and cutting etc.  Started off very well - and I was feeling rather smug.

But then I put one of the roof sections in place...  it didn't fit.  After some colourful language on my part I realised that I'd measured the side walls to be plush with the upright part of the apex sheet.  I had also decided to leave an overhang on the roof.  The result of those decisions meant I should have angled to top of the wall.  I toyed with several other options such as raising the apex sections to compensate.  In the end I decided I had to cut an angle on the top of the walls.  Luckily my Bosch jigsaw has a mitre setting where you can angle to cut so I cut a 45 degree slice off the top of each wall.  This of course meant I had to paint the exposed ends again.


Now I could start assembling it on top of the platform.  The first few sections were easy enough.  But I was struggling getting the screws into the plywood.  Eventually I had to pre-drill the holes - after wrecking the heads on about 10 screws and wrecking a screwdriver bit.  


Getting the final roof section in place was a fine balancing act.  Jo had taken the kids to a birthday party (yes, another birthday party!) so I had to do it on my own.  Managed to do it by using a long piece of 2*2 to rest one end on whilst I screwed to other in place.  Then it was done!  House in place.  Bobby and Daisy were over the moon when they got back from the party and saw it.


That was enough for one day - almost 9 hours work...  I am sun burnt, sore and shattered!  Nothing but admiration for anyone who does manual work like this for a living, 5 days a week.  Tomorrow, I'll get the railings up and maybe felt the roof.


Sunday 20 May 2012

DAYS 5 and 6

Spent 2 hours on Saturday morning at the timber merchants (Champion Timber, New Malden) and B&Q.  Took ages to find the wood I needed.  Had gone there with the intention of buying external plywood - but when the guy took it out it looked terrible - full of big knots and cracks.  So after much discussion with the very helpful sales assistants I decided to buy hardwood veneered plywood.  Now this is not recommended for external use - but the guys said if I painted it and sealed the edges it should be fine.  They cut it into the shapes I required (6 rectangles)  I also bought 28 meters of 2*2 which I would use as the frame for the house and the hand rails and 60 L brackets and 400 screws to put it all together.
Then off to B&Q to get some paint.  The cantankerous old git in the paint section looked at me like I'd two heads when I asked him where the sealant was - then he barked "4 isles over".  Couldn't see anything obvious so just got some Ronseal Blue external wood paint (Bobby had insisted on a blue tree house).  
Jo was off on a wine tasting all afternoon and I had to take the kids to a birthday party - so all I had time to do was quickly check out my new jigsaw by cutting the corners off 2 of the rectangles to make the gable ends of the house.
Rain was forecast for today - but miraculously we didn't get a drop all day so I got a full day's work in.  First job was to cut all the plywood into the required shape and cut out the doors and windows.  The Bosch jigsaw was the business for this.  I drew out every cut line in pencil first.


Once that was done I sanded all the edges and painted them with the Ronseal decking end grain preserver - still have half a tin left so I might as well use it.  It's not really a sealant - but it should slow down the rotting.  You can't paint over it for 3 days!  So i decided to start cutting the 2*2 to size.  Wasted 30 minutes trying to fix the guiding laser on my neighbours mitre saw - only to realise there was an on/off switch I hadn't seen.
Here's the first gable with all the wood cut to size (not screwed in yet).
I thought I'd been very clever cutting 45 degree cuts in the diagonal bits - only to realise that left a bit of an over hand with the upright.  Did some quick geometry to work out the angle should be 22.5 degrees on both the upright and the diagonal.  Didn't want to redo this end - so I'll stick with it...  but here's how it should have looked.

With all the 2*2 cut - I sanded the ends and painted them with the grain preserver.  I still had a couple of hours working time to go - so I decided I could paint one side of the plywood, avoiding the edges.

Next weekend it will need a second coat, paint the edges and paint the other side.  Hoping for decent weather!


Sunday 13 May 2012

DAY 4

Well Saturday was a write off as I had a work do in the corporate box at Ascot, so when I got up this morning I knew I had some catching up to do.  First task was to cut the remaining joists to size and put them in place.  I didn't attach these to the frame as the decking boards will hold them in place.  Once cut, I painted the exposed ends with Ronseal Decking End Grain Preserver - this will help prevent rotting of the wood on the exposed ends.  Let's hope it does exactly what it says on the tin.

With these in place I was ready to start cutting the decking boards to size and putting them in place (having painted the ends with the Ronseal preserver).  Couldn't have done this without the mitre saw I'd borrowed from a  neighbour.  The reject decking I'd bought from edecks.co.uk came in good sized lengths so most of the boards could go down in one piece.  For the one's that couldn't I'd placed 2 joists right next to each other so I'd have plenty of joist to screw the meeting ends in place.

I used galvanized decking screws from edecks - and screwed them in using my drill with a screwdriver bit.  I was very please with how sturdy the platform was when I got on top to put the last few boards in place.  Once all the boards were in place on top - I placed two more boards on the front and side to cover up the joists.  One of the reject decking boards had a bad crack - so I used that one as it wouldn't have to support any weight.
With all the decking done - I decided to carry on and build some steps.  I had 2 2*4 joists left over and the off cuts from the ones I used.  I needed to join the steps to the platform at a very wide angle - wider than the mitre saw would cut, so I had to get out my traditional saw and do it by hand.  I only had to cut two boards - but it made me appreciate the mitre saw even more.  With the two uprights cut I attached 4 steps checking the were level using my spirit level (painting all the cut ends with Ronseal).  I had to pop to Wickes to get longer screws for this - 100mm exterior wood screws.
All done - platform, decking and steps - Bobby seemed impressed anyway..

I've just ordered a load of 2*2 joists for the rails and next weekend I'll head to Champion timber to get some large sheets of MDF or something to make the house to go on top...  below is the updated plan..


Monday 7 May 2012

DAY 3
Well, it being a bank holiday Monday in England... it has been raining on and off all day.  Despite this I have made excellent progress.  First thing, I placed my two 'H' frames in the holes and check how far off level the four holes were.  More digging on all four was required.  This was back breaking work - breaking up the soil with a crowbar, then scooping out the soil by hand.  After about 4 or 5 attempts I managed to get the two frames sitting level.
Then I got the spirit level out and checked all 4 vertical poles were straight.  I used some old bricks and rubble I had to wedge them in position in the holes.  When I was happy all 4 poles were vertical and the two large joists reasonably level, I screwed to cross joists into place to hold the whole frame together.  Luckily a neighbour has lent me his mitre saw - so I was able to get the correct angles on the joist edges.  I screwed them in place with 2 Heco Topix® Countersunk Hardened Steel Woodscrews on each pole (having pre-drilled the the joists to make it easier to screw them in and less likely to split the wood.
Once this was done I had the core structure assembled and level.  Just as another heavy shower started I put the cement in the holes.  I used B&Q Blue Circle Postcrete.  I half filled the holes with water, then emptied the bag on top (one bag each hole).  I put this on top of the bricks and rubble I had placed in the holes.
Within 20 minutes the structure was solid.  Once again, I decided to quit whilst I was ahead.  Next weekend I'll start cutting and screwing remaining joists and the decking in place.  Really happy with the weekend's work - I'm pretty sure the most difficult part of the construction is done.  Amazingly the hostas, fern, soloman's seal and iris under the platform survived!!!

Sunday 6 May 2012

DAY 2
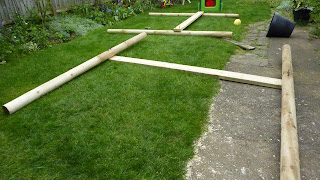
Not as productive a day as I'd hope - too much wine last night, rained all morning and had a kids birthday party in the afternoon...  Picked up the concrete for the posts from B&Q and surveyed the site:

Dug two of the holes for the poles - using a shovel and a crowbar to break of tough ground.  Assembled the second H.

Hope to get more done tomorrow - but weather isn't looking good.

Saturday 5 May 2012

DAY 1
For some unknown reason I have decided to build my son a tree house for his Birthday in 6 weeks time.  This isn't something I have rushed into - I have been contemplating building a tree house since we first moved to our current house.  There are two main challenges to this project - firstly we don't have a tree big enough or strong enough, secondly I have no aptitude or experience for DIY.  Nonetheless here I am.  My brother-in-law built my niece and nephew the tree house below and as soon as my son saw it, he has been asking for one.
Now there is no way I am going to try and replicate the above - the bro-in-law is a talented artist and DIY expert.  He has set the bar very high - and I'm not going to make myself feel inadequate by trying to emulate this.  I am going for a very basic tree house - which technically wont be a tree house - but a raised play house behind a small tree...  close enough.
First thing is to build a basic platform - so I knocked up a design in Google Sketchup (great little tool once you get the hang of it)

Next I ordered all the wood online using edecks.co.uk - they were way cheaper than any of the local timber merchants or DIY superstores.  The also sell reject decking - which is slightly discoloured or has one to many big knots it in (fine for a treehouse).  The wood arrived on Thursday and I inspected it this morning::
My son took one look at the piles of timber and asked me "Daddy, where's the 'structions (instructions)?".  When I told him there were none he gave be a funny look...  I think he also feels I've bitten off more than I can chew.  First hitch - they'd delivered the wrong poles (too short).  I had my heart set on starting work this weekend - so I had to pop down to Champion Timer and buy the correct ones (though edecks will collect the old ones and refund me... )  Then I went to screwfix and bought some coach bolts.
Now it rained most of the day - so when it stopped I set myself the target of drilling the holes in the poles and joists.  This required careful measurement and accurate drilling.

Having drilled the four posts that will support the structure and the 2 joints that will support the decking - I decided to put the first 'H' together to check I had drilled correctly.  I hadn't.  I had drilled one hole at a slight angle so the carriage bolt came out at an angle.  Several more drill holes and profanities later - I bolted together the first 'H' - success!!!
I decided to quit while I was ahead.  Part of me was tempted to stick this in the ground, paint it white and tell my son I'd made him some Rugby goal posts...  then use the rest of the timber for expensive firewood next winter.  But no - I will carry on tomorrow and Bank holiday Monday, weather permitting.  Target is to assemble the other 'H' - attach the two together, and get the structure set in concrete in position. Then I'll have a stable base to start laying out the decking.